
The human weapon system can be improved by enhancing sensory acuity and the use of supplemental, force-multiplying tools technology just like any other. In order to achieve optimal performance we must align the environment, the mechanism, and the human. The first, most obvious sense to weaponize is vision. This means we must understand optical acuity and types of vision-enhancing prisms.
When it comes to optical acuity let’s focus on the most common piece of optical machinery: binoculars.
If there’s a product consumers are more willing to throw money at with complete ignorance and negligence than a pet rock, it would have to be binoculars (and for that matter other optics). The market contains such a wide range of quality that it’s hard to blame someone for not knowing WTF he’s buying, but if he’s serious, he’ll attempt to learn.
Let’s begin to address that. Say you’re in the market for some new binos. First we’ll discuss what you should initially be looking for, then we’ll focus on the two major types of binoculars.
Hold your questions until the end of the briefing, please.
The first thing to ask should be, what task will I most likely use them for? You should also be considering where they’re going to be used, and what your budget is.
For the purposes of this article, we’ll be looking specifically for binos for handholding and glassing on the move. We will discuss stabilized glassing in later articles.
I often use bions for deer hunting in southern Arizona, and elk hunting in northern Arizona. In northern AZ my experience teaches me that I can expect a 50-300 yard spotting distance on average. Binoculars with large objective lens at a lower magnification power will give me large field of view, along with the ability to track moving objects from improvised positions. Thus 7x42mm or 10x50mm set of binos would be optimal.
Southern Arizona hunting, on the other hand, involves much longer line of sight, but with deceiving shape clutter. Average spotting distances in that environment range from 100-600 yards. Thus 10×50 and 15×56 combos are called for.
Birdwatchers should consider large objective lenses for large field of view and lower power for short ranges. Marine operations call for something that’s going to work well on a constantly moving platform; think a 3-10×42-55mm optic. Rotary aviation or fixed air to ground search should consider optics that provide a large field of view and excellent tracking ability, like a 10-15×56+.
All of these tasks involve the three primary reasons we recognize objects: shape, contrast, and movement.
Porro vs. Roof Prisms
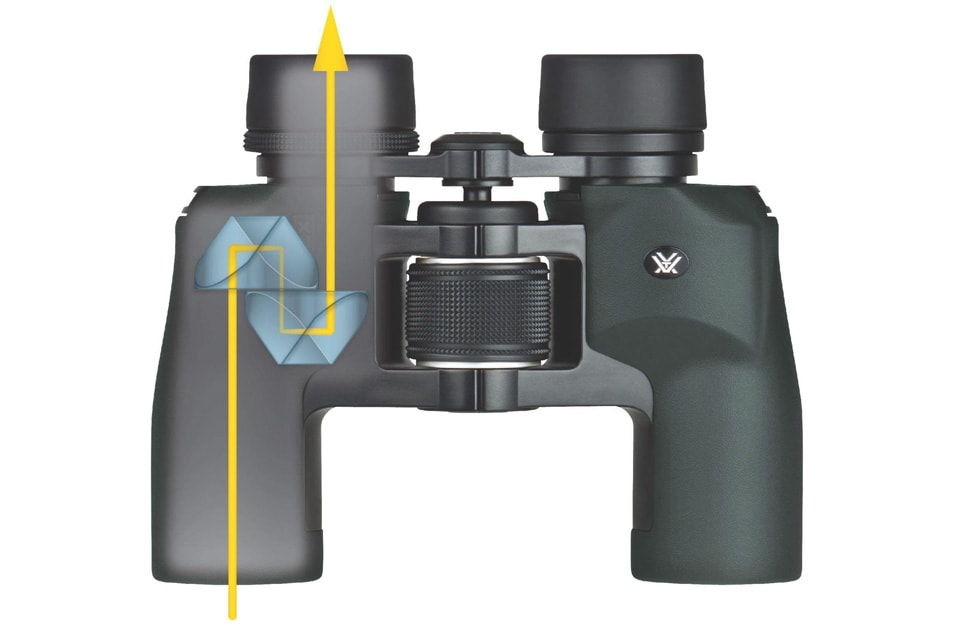
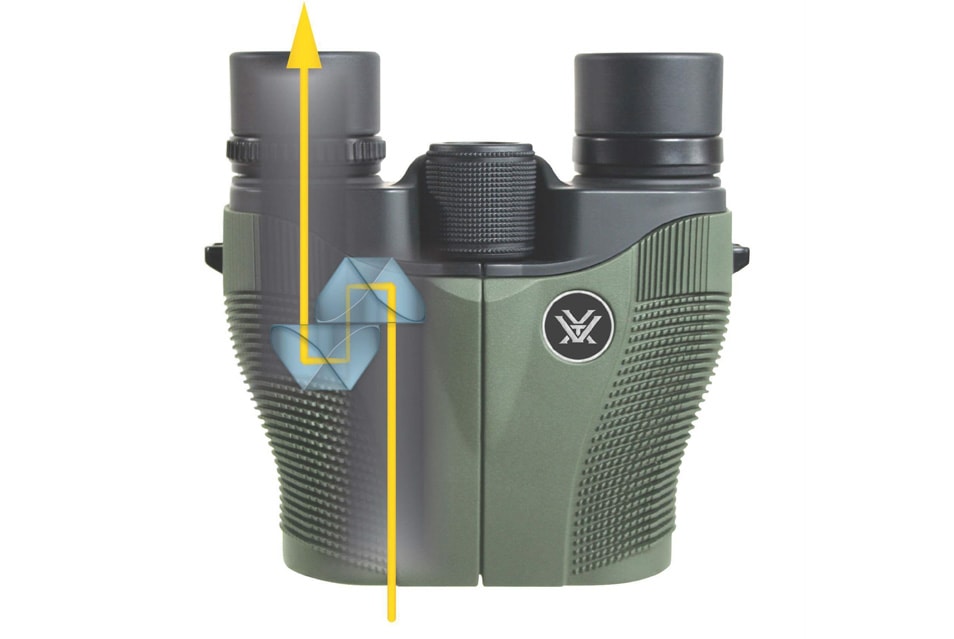
A serious consideration of optics will demand the choice between roof or porro prism binos. It’s very easy to differentiate between the two; the classic offset objective and optic lens design of a porro-prism bino has been around since the mid 1800s. On the other hand, the roof-prism binocular, introduced by the Karl Zeiss Company in 1960, is the straight-tube type with the objective and optic lens in alignment.
So what’s the difference? Which is better?
It’s very simple, and has to do with light refraction, itself very similar to how our own eyeballs work.
When light (an image) passes through a convex lens it gets turned upside down. To account for this, a combination of prisms are placed in the tubes of binoculars to erect the image right side up before it reaches your ocular lens. The first bino system was the porro prism, which by using two prisms could erect a magnified image clearly with excellent brightness in a very short distance from objective to ocular lens. The offset wide objective lens enhances depth perception as well.
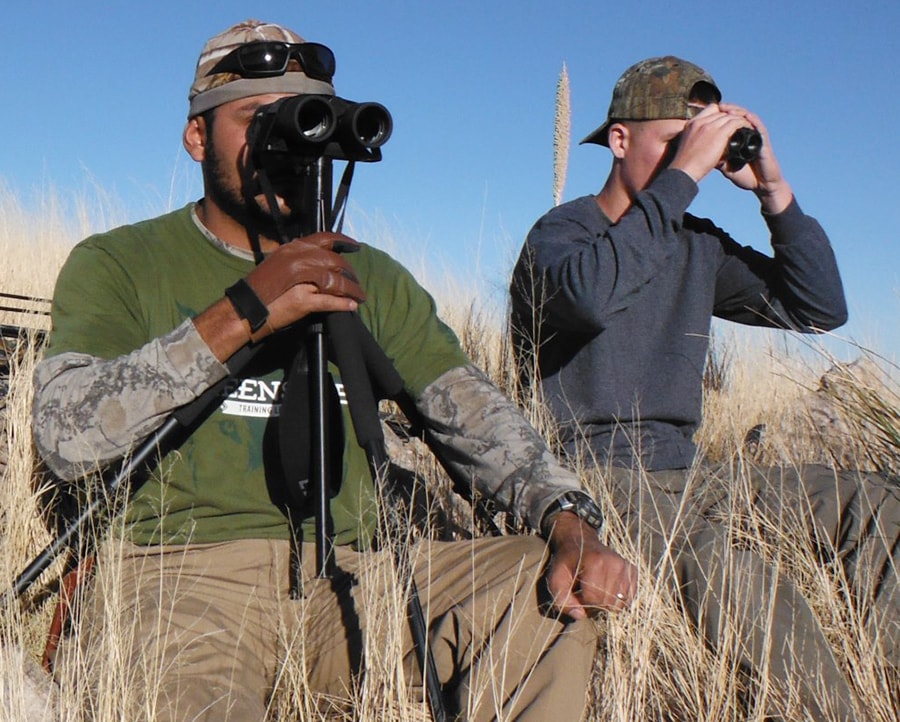
Here’s another tip: hand holding vs. tripod mounted; you’re better with the latter. If you’re limited to the former, don’t throw the elbows out. Tuck them up against your rib cage to minimize movement transferred to the binoculars. In this photo I am using UltraVid 10×42 Leicas mounted with a Jim White Uni-Daptor on an Outdoorsmans Pistol Grip Head attached to a Slik light weight tripod. From this position we are identifying individual Coues Whitetail (a 20 – 30 in. shape) at 3 – 4,000 meters in different light conditions.
A negative aspects of the porro prism devices is that they’re harder to seal in regard to internal gas and water proofing. They are also fragile and susceptible to misalignment upon impact. Other disadvantages include a lack of compatible carry pouches, inferior ergonomics, and a necessity to individually focus each eye piece, though if you have large deviation between your left and right eye prescription, a roof prism bino may be better for you.
Conversely, the biggest appeal for porro prism binos is that the light hits only four different reflections before reaching the eye. This manifests in sharper image resolution and increased light gathering.
Light is like a pool shot; you want to get it right in the pocket with the least disturbance possible.
However, advances in lens coating technologies are allowing the roof prism to increasingly edge out the porro’s minimal advantages. The more money you cough up the larger the gap between roof and porro becomes, and most users find the ergonomics of a straight tube to be much superior.
Roof prisms were introduced out of practicality. By placing all lenses in the same line of sight\, manufacturers could reduce material costs, increase durability, and improve weight and portability. Other advantages of the roof prism are fewer internal parts, an ability focus on closer objects, and my favorite feature of all, the ergonomic single centered focus knob (a common feature in most roof prism binos). However, a roof prism image must pass through six different reflections traveling from objective to optic lens. This results in lower image quality and less light-gathering ability. Lens coatings by various manufacturers who apply phase and di-electric coating processes to their prisms mitigate this issue, but do not eliminate it entirely (thus the better the binos, the more expensive they are).

The thing to remember is, the best set of binoculars is the one you have on you — hunting, LE, military, survival and preparedness…some sort of optical acuity enhancing device should be a part of your kit, in your loadout, accessible in your vehicle, or otherwise staged somewhere it can be readily accessed when needed. Such equipment is a force multiplier all too often disregarded and misunderstood.
You need not be an optics wizard to buy your next glass. Do your research, and buy the best thing for the mostly likely task at hand. Don’t be the person with thousand-yard rifle who cannot shoot past 300 yards, or the one tasked with potential life-saving reconnaissance limited to the potential of the bare Mk. I eyeball. By the same token, don’t be one of those folks with high-end optics who never use them to full potential.
The use of binoculars involves tradecraft like any other skill. You can learn to glass effectively; knowing how the mechanism you’re putting in front of your face works is a big part of that.

⚠️ Some hyperlinks in this article may contain affiliate links. If you use them to make a purchase, we will receive a small commission at no additional cost to you.


0 Comments