
If you’ve been following me on social media, you know I’m a huge fan of taking a rattlecan to my optics. It’s a great solution for those who want to customize the look of their weapon. I’ve done a few, and I think they turned out great (if I do say so myself). Especially since I didn’t really know how to paint a rifle scope, much less a rifle, at least at first. Fact is, the hardest thing about painting your rifle (or optic) is actually committing to painting your rifle.
For those on the fence, I recommend starting with something small. Today, I’ll go over a small, simple project to practice scope painting. My friend Sean McCauley of Cloud Defensive knew I needed some glass for my SCAR 17, so he sent me a well-used Vortex Viper PST 1-4×24 optic that needed a new home, along with a BoBro Engineering mount.
How to Paint a Rifle Scope
Sean runs his guns hard, and it shows. The Viper’s exterior was pretty badly beaten up, but the glass was still in perfect condition and clean. A new paint job was applied to give it a fresh look, and you know me, it had to be FDE.
BLUF: Painting a riflescope, often called “rattle canning,” is an easy DIY process used to camouflage your optics (or to color-match them to the gun they’re mounted to. By properly shielding the lenses and dials (typically masking them with tape) and degreasing the surface, you pave the way for light, overlapping coats of spray paint, e.g., “rattle can.” Once finished, you’ll have given your optic a durable, ~ sorta professional-grade finish that breaks up the optic’s silhouette, reduces shine, and/or gives it a desired aesthetic look.
It’s all about the rattlecan and scope painting in this installment of Just the Tip!
Recommended Materials for Rattlecan Scope Painting
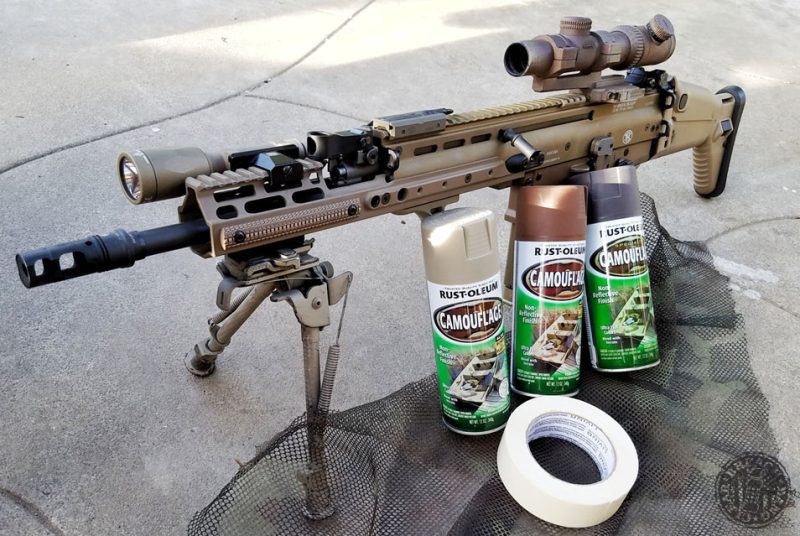
- Paint Cans. I use Rustoleum Camouflage FDE spray paint because it’s inexpensive and available at Home Depot.
- Masking Tape. You can use any kind of tape, but masking tape is the easiest to use and doesn’t leave residue behind.
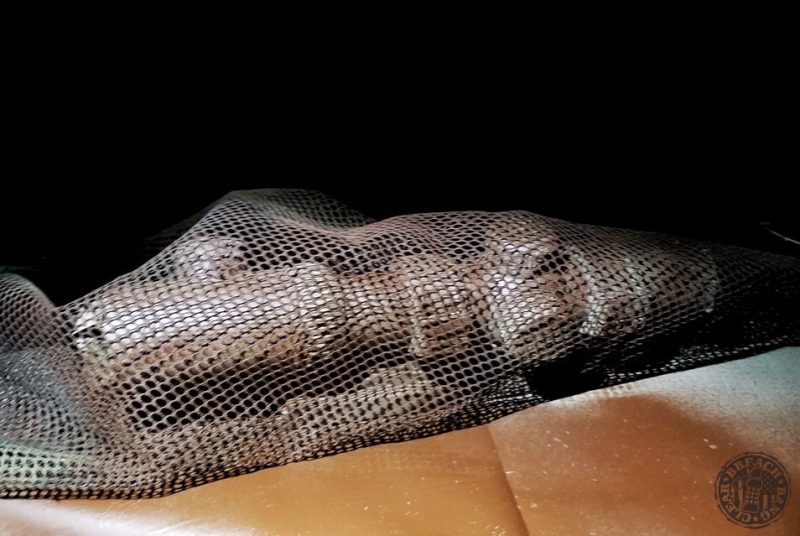
- Pattern stencils. I like to use camo netting to get a scale-like pattern. You can use virtually anything, like leaves, etc.
My Gear for the Project
- The optic: Vortex Viper PST 1-4×24 (or your preferred LPVO)
- The mount: BoBro Engineering Precision Mount
- The paint: Rust-Oleum camouflage spray paint
- The pattern: a piece of camo net or scrim
- High-adhesion masking tape
That’s all you really need, so let’s get started!
I break the entire process into three phases:
- Preparation
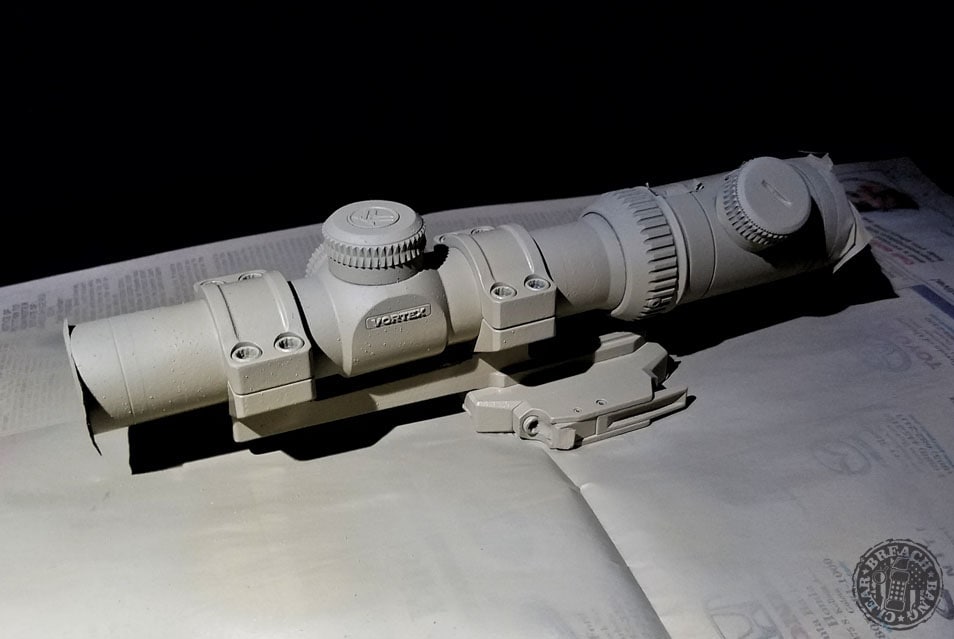
Clean the optic to remove oils and dirt. Use masking tape to cover the lenses, turret numbers, and serial numbers. Ya gotta make sure those functional parts remain paint-free.

- Painting
Apply a base coat of your chosen rattlecan (in this case, FDE spray paint) using short bursts from 12 inches away. Layer your chosen colors using netting or stencils (tight against the scope!) to create a broken camouflage pattern. Don’t just blast it like primitive graffiti!
- Drying
Let the optic dry in a dust-free area for at least 24 hours. If you can remain patient that long. Do not remove the masking tape until after the paint is fully cured, or you’ll end up smudging it (or pulling paint away, or both).


This is the same for painting anything I work on.
Shooter Make Ready: How to Prep a Scope for Rattlecan Painting
Start with cleaning; wipe down the surface to remove dirt, dust, and oil residue from your fingers and other sources, so the paint can contact and adhere to the surface. You can wipe it all down with degreaser or a cloth soaked with rubbing alcohol if you like, but it’s not strictly necessary.
A dedicated degreaser will produce a superior result if you’re looking for an ideal, permanent coating, but if you’re working on a field-expedient rattlecan job on something where natural wear is expected, a simple wipe-down is sufficient.
LESSONS LEARNED: Even if you’re not using a dedicated degreaser, wear nitrile gloves during the final prep. Skin oils are a big reason people get “rattlecan peel’ on high-use areas. (Ask me how I know.)
Next, tape off with masking tape. This is very important; you don’t want paint in critical areas. In this case, for the optic, the critical areas are obviously the lenses.
Other areas I tape off include the numbers on the dials, a fiber-optic indicator for magnification level, the serial number in case it needs warranty work, and the bottom contact area of the BoBro mount where it attaches to the Picatinny rail.
And Now the Actual Scope Painting:
Find a good platform to place the item. If you can hang it, great. If you can’t, that’s fine too. Ideally, you’d want at least a table height if possible.
The best technique is to shoot short bursts from about 12 inches away.

I started with the base layer. It’s best to use the lightest color you have and apply a light coat (for this optic, I used a light sand color). The key is to apply many light coats, letting each one dry before applying the next, and to hit all the angles from high and low. Once the initial coat was dry enough, after I waited at least fifteen minutes, I carefully picked it up from the masking tape areas and flipped it over on its side to spray the bottom half.
ENVIRONMENTAL SOP: When using FDE gun paint (or any rattle can for that matter), always pay attention to humidity. 40%-60% humidity is your sweet spot. High humidity slows drying time, can cause blushing or peeling, and results in a sticky surface. Low humidity (rougly 30% and below) can cause your paint to dry too quickly. This could result in rough textures, poor adhesion, and uneven coating.
Keep in mind that I was doing all the painting at night, with a scarce amount of spare time in my schedule. I would normally take much more time letting each coat dry, but time is not a luxury I have at the moment. Plus, I’m impatient as hell, and wanted to see how this would turn out.
So I moved on to the next color, light brown. I wrapped the scope as tightly as I could and started spraying lines at random. Having the netting or stencil close to the surface gives you more definition rather than having it loose. I repeated this process by moving the scope and replacing the netting until I got the desired effect.
I then moved on to the third color, dark brown, and again I used the netting. I thought I went a bit overboard with the dark brown, so I went back with the light sand color, something I’ve never done before. It started looking off to me, so I had to alternate between light sand and light brown until it looked right. After a bunch of extra light coats, I felt like Goldilocks because it was just right.
REMINDER: You’ll get better results on that scale pattern if you pull the netting tight against the scope body. If your stencil is loose or baggy, paint mist will wrap around the edges, leaving smudged lines and unintended runs instead of a nice, crisp pattern.
This is what they call Rattlecan Magic. It’s an art form that takes practice and experience.
Drying then Done:
This part is crucial and tedious, but I stuck with it. I put the Viper in a closet so no one would touch it. I left it overnight and didn’t do anything until I got home from work the next day. Once I got the chance, I slowly started to remove each piece of masking tape.
I couldn’t be happier with the result. It came out looking Burnt Bronze, almost the same finish as standard Razor optics, but with some unique camo patterning.
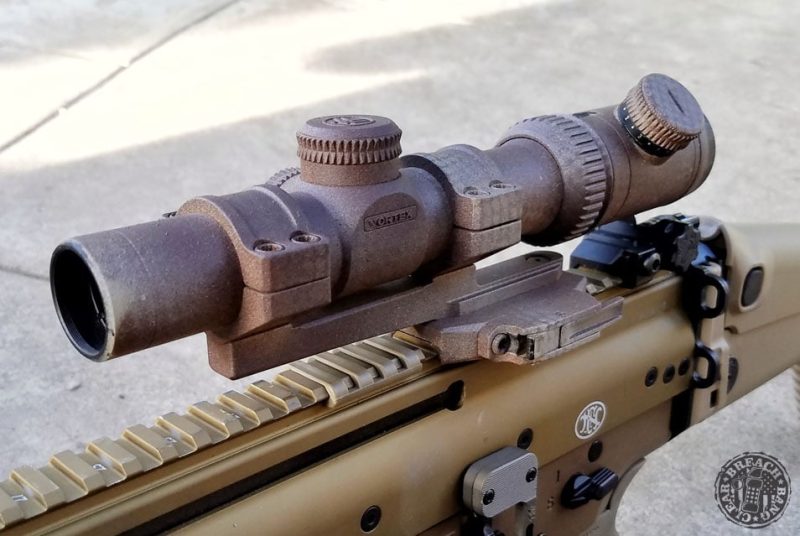
As you can see, there’s not much to it. Some paint will rub off from use (as it will with any rattlecan job), but that just means you actually use your firearms. So it adds character! If you want something more permanent, go with a qualified Cerakote applicator, but expect to pay more.
Like I said at the beginning, start small before you take your FDE gun paint (or whatever color you choose) to your long gun!
Good luck with your projects, and please tag me in your pictures. I always like to see what everyone comes up with.
And also, if you need some help with your project, you can get a handle on some folks’ idea of the best FDE spray paint options (and how they compare) in this Reddit thread.

Use “Breach15” at checkout and save 15% on holsters from StealthGear USA.
50 Shades – How to paint a rifle scope


0 Comments