Today Mad Duo Nate takes a break from his normal routine of ingesting whiskey and nicotine while staring hatefully at hipsters to tell us about his DIY (Do It Yourself) camping stove. He set it up so you can carry it “sleeved” over a Nalgene bottle while you’re hiking. Pretty sweet idea, if we do say so ourselves (and we do). Mad Duo

Rocket stoves, volcano stoves, hobo stoves; there are many kinds of different lightweight wood and charcoal backpacking stoves on the market. Most people that camp, hike or spend a lot of time in the outdoors own and use some sort of field stove to cook meals or boil water. Sterno cans, white fuel or multifuel stoves, propane and butane stoves- there are many options. Having mostly used propane stoves stateside (and multifuel stoves to burn easily accessible JP-8 military fuel overseas), I have had limited exposure to wood burning units. The downside of these commercial stoves is the requirement to buy, store and carry the gas. All the fuel canisters are expensive, take up space in your pack, and eventually run out. So trying to find a cheap, light, and efficient wood burning stove is a good idea. Having experimented with different configurations and styles of homemade stove, I have found one that is ideal for my requirements.
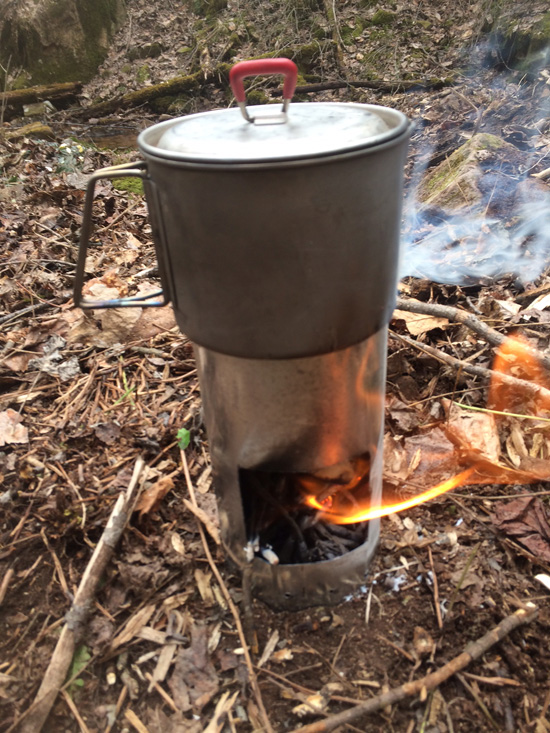
I don’t carry canteens, I primarily carry my water in camelbak bladders and Nalgene bottles. Nalgenes are practically indestructible, and don’t absorb flavor from flavored Gatorate powder or other beverages. The wide mouth opening is great for filling with ice, and they can be used to carry small items as a crush proof container. There are also many options of stainless steel or titanium “canteen cups” to fit these bottles. So what I set out to make, was a lightweight super-simple bottle kit to use on day hikes or when my jetboil /gas stoves run out of fuel in the field. The objective is a thin steel stove that sleeves over the Nalgene bottle and canteen cup to create a easy to pack and simple cooking system.
Going to the hardware store, I originally intended to buy a sheet of thin gauge stainless steel. Shocked at the price, and not really happy with the options I found, I decided to go look at the chimney and stove section of the store. I had brought a nalgene along with me to the store, just in case I found something prefabbed that might work and fit the bottle. I ended up discovering a section of 30 gauge 4” diameter galvanized steel stove pipe. A 24 inch section was only a couple of bucks, and I figured I could cut it to size and save myself the trouble of riveting a sheet into a cylinder. With the rolled edges of the stove pipe, the two sides lock into each other to form the tubular shape. The concept I envisioned was the ability to unlock the tube at times and be able to use the stove as a wind screen or heat reflector for my primary stove.
Back home, equipped with a Dremel tool, tin snips and sharpie I got to work. First I figured out how tall I wanted the stove to be. I settled on 7”, which is the height of the Nalgene until it reaches the cap. I used the tin snips to carefully trim the stove pipe sheet to length. Two inches from the bottom edge of the stove, I used a cut off wheel on the Dremel to cut a 3”x3” window into the sheet steel. After I created the window, (which will be used to feed wood into the stove) I switched to a drill bit and bored out a series of holes spaced one inch apart. The holes will allow air to flow in and smoke to push out.
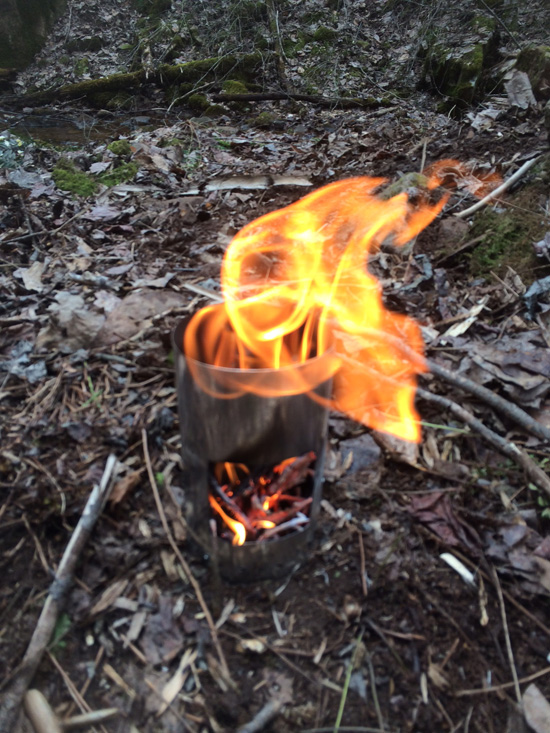

That’s it. It only took about 15 minutes to construct, cost about 5 bucks, and fits my Nalgene. Testing the stove out, I was able to boil 16 ounces of water in a titanium cook pot in about 8 minutes after getting a good fire going. The standard stainless Nalgene canteen cup is also large enough to sit on top of the stove. (The swing out handles prevent the cup from slipping down inside the stove.) Breaking off dry branches the size of a pencil, up to the diameter of my thumb, I needed to continuously feed the fire while boiling the water. I was able to do this by simply grabbing nearby branches around me without the need to go hunt for wood. After I was done boiling the water, I pulled the stove up and out of the coals with a multi tool and placed it aside to cool. The outside of the stove remained pretty clean, but the inside is jet black from the burn. Five minutes away from the fire, it was cool enough to be placed back around the bottle and throw into my pack. If you wanted to stop for a half hour while hiking to relax and eat lunch, this simple set up will work out great!
So there it is, a simple and cheap stove you can make on your own and use on your next outdoor trip. Don’t say Mad Duo minions never taught you nuthin’.
![]()


0 Comments